A bunch of elderberries are surrounded by white flowers
September 2, 2024
Summer’s wrapping up, and while we might be doing a happy dance as the kids head back to school, we all know what’s lurking around the corner—the dreaded back-to-school cold. But don’t worry, I’ve got a little secret that’s been a game-changer for my family: elderberry syrup. Why I Swear by Elderberries * These tiny, dark berries are like nature’s multivitamins. They’re packed with antioxidants and vitamins that help boost your immune system, making them a perfect defense against colds and the flu. And if you’re already starting to feel that scratchy throat or stuffy nose, elderberry syrup can help lessen the symptoms. It’s like having a natural, sweet-tasting remedy that actually works. Where to Find Elderberries If you’re lucky enough to live in the countryside, you might just find elderberry bushes on a walk or drive. They love soaking up the sun, so check along roadsides or open fields. There’s something satisfying about picking your own berries, knowing you’re gathering the good stuff straight from nature. But if foraging isn’t in the cards (or you’re just not up for it), don’t worry! You can easily order organic elderberries online and have them delivered right to your door. It’s like having a little piece of nature shipped directly to you. Harvesting Elderberries: My Favorite Part Some varieties of elderberries can be toxic when eaten raw – the best way to avoid this is to make sure you always cook your elderberries well first When you find a bush full of those gorgeous, deep purple berries, it’s a bit like discovering a hidden treasure. I always bring along a pair of scissors and a bucket or bag to collect them. Snip the clusters, let them fall into your container, and you’re set. Back at home, give the berries a good rinse to wash away any dirt or bugs, and let them dry on a towel. Here’s a trick I love: freeze the berries overnight in a bag. The next day, give the bag a shake, and the berries will pop right off the stems. It’s oddly satisfying and a great way to relieve some stress!
Turning Fallen Trees into a Chicken Roost
Dawn's Simple Life

A Simple DIY


With more chickens joining the flock, it quickly became clear that we needed extra roosting space. I noticed some of the hens were hesitant to enter the coop at night, likely because the pecking order left them without a spot to settle in. No roost means no rest for my girls, and I wasn’t having that!


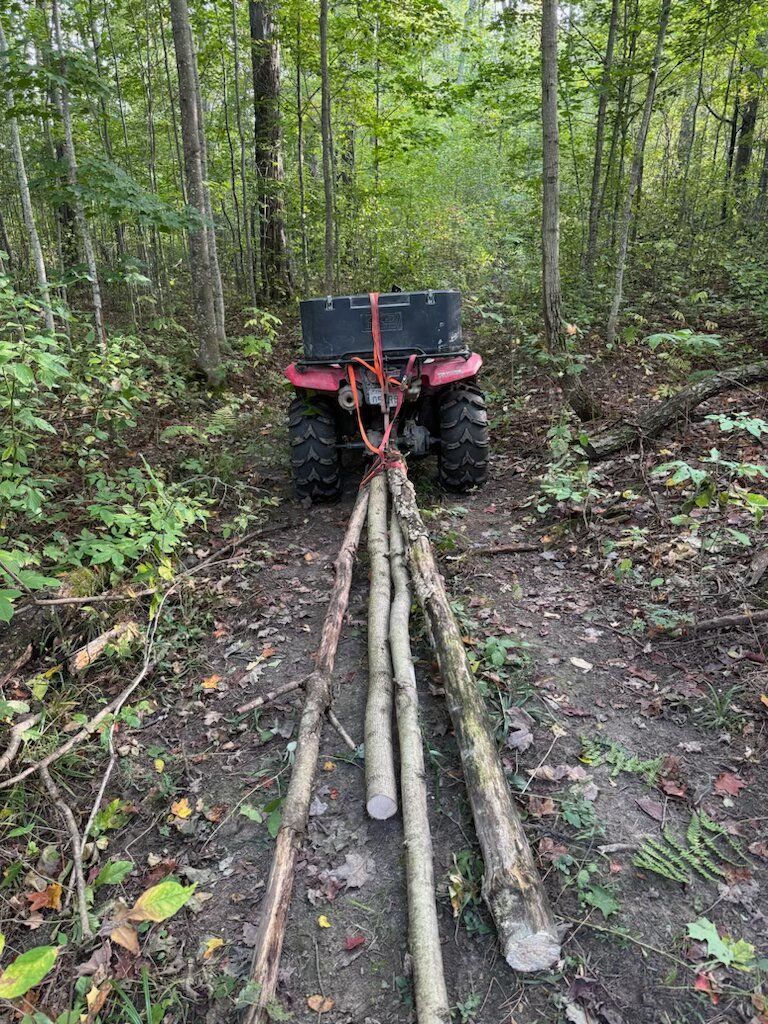
So, armed with determination, I grabbed my chainsaw, a set of ratchet straps, and hopped on the four-wheeler to fix the problem in the most resourceful way I could think of—repurposing fallen trees as chicken roosts.


---


The Hunt for the Perfect Fallen Tree


It didn’t take long before I found myself down the road and into the bush, riding along the trail in search of the perfect fallen logs. Once located, I carefully cut them down to a manageable size and strapped them securely to the back of the four-wheeler. With everything tied down and double-checked, I began the slow and steady trip back home, logs in tow—my chickens were getting their new roost tonight!


---


Building the Roost


Back at the coop, the real work began. First, I unloaded the logs and got all my tools ready: measuring tape, drill, screws, and, of course, the trusty chainsaw.


1. Measuring & Cutting:
I started by cutting the largest log in half and brought one half into the coop to see how it fit. After realizing it was too long, I measured and trimmed it down to the perfect length. I did the same with the other half.


2. Placing the Bars:
Once cut, I measured the distance between two sturdy posts in the coop to support the roosting bars. It took a few tries, but I finally got the placement right. One of the kids helped by holding the log in place while I secured it with 4-inch screws, using two screws per side to prevent the bar from spinning.


3. Final Touches:
After eyeballing the spacing between the bars (let’s be honest, the chickens won’t care if they’re not perfectly measured as long as they have enough space), I fastened the legs to the coop walls to ensure everything was secure. 


---


The Nesting Box Update


With the new roost in place, I realized I needed to relocate the nesting boxes to make room for the updated setup. I moved the nesting boxes across the coop and added a slanted board above the milk crate boxes. This clever addition prevents the chickens from perching on top of the boxes and making a mess on the hens below.


---


Happy Chickens, Happy Life


So far, the new roost seems to be a hit! The hens are content, and no one’s left homeless at bedtime anymore. The coop is looking much more organized, and with the nesting box update in place, there’s far less mess. 


There are still plenty of updates and improvements to make, but this project is one more step toward creating a comfortable, well-functioning home for the flock. It just goes to show that with a little creativity, you can turn fallen trees into something useful—and the chickens are definitely happier for it!


---


This DIY project not only saved us money but also repurposed natural materials to create something essential for the coop. Stay tuned for more updates as I continue to make improvements to keep our ladies happy and healthy!


More Dawn's Simple Life inspirations

A bunch of elderberries are surrounded by white flowers
September 2, 2024
Summer’s wrapping up, and while we might be doing a happy dance as the kids head back to school, we all know what’s lurking around the corner—the dreaded back-to-school cold. But don’t worry, I’ve got a little secret that’s been a game-changer for my family: elderberry syrup. Why I Swear by Elderberries * These tiny, dark berries are like nature’s multivitamins. They’re packed with antioxidants and vitamins that help boost your immune system, making them a perfect defense against colds and the flu. And if you’re already starting to feel that scratchy throat or stuffy nose, elderberry syrup can help lessen the symptoms. It’s like having a natural, sweet-tasting remedy that actually works. Where to Find Elderberries If you’re lucky enough to live in the countryside, you might just find elderberry bushes on a walk or drive. They love soaking up the sun, so check along roadsides or open fields. There’s something satisfying about picking your own berries, knowing you’re gathering the good stuff straight from nature. But if foraging isn’t in the cards (or you’re just not up for it), don’t worry! You can easily order organic elderberries online and have them delivered right to your door. It’s like having a little piece of nature shipped directly to you. Harvesting Elderberries: My Favorite Part Some varieties of elderberries can be toxic when eaten raw – the best way to avoid this is to make sure you always cook your elderberries well first When you find a bush full of those gorgeous, deep purple berries, it’s a bit like discovering a hidden treasure. I always bring along a pair of scissors and a bucket or bag to collect them. Snip the clusters, let them fall into your container, and you’re set. Back at home, give the berries a good rinse to wash away any dirt or bugs, and let them dry on a towel. Here’s a trick I love: freeze the berries overnight in a bag. The next day, give the bag a shake, and the berries will pop right off the stems. It’s oddly satisfying and a great way to relieve some stress!

Share